Initial Setup/Installation
Background/Terminology
Before we jump into setting up FireSim, it is important to clarify several terms that we will use throughout the rest of this documentation.
First, to disambiguate between the hardware being simulated and the computers doing the simulating, we define:
- Target
The design and environment being simulated. Commonly, a group of one or more RISC-V SoCs with or without a network between them.
- Host
The computers/FPGAs executing the FireSim simulation – the Run Farm below.
We frequently prefix words with these terms. For example, software can run on the simulated RISC-V system (target-software) or on a host x86 machine (host-software).
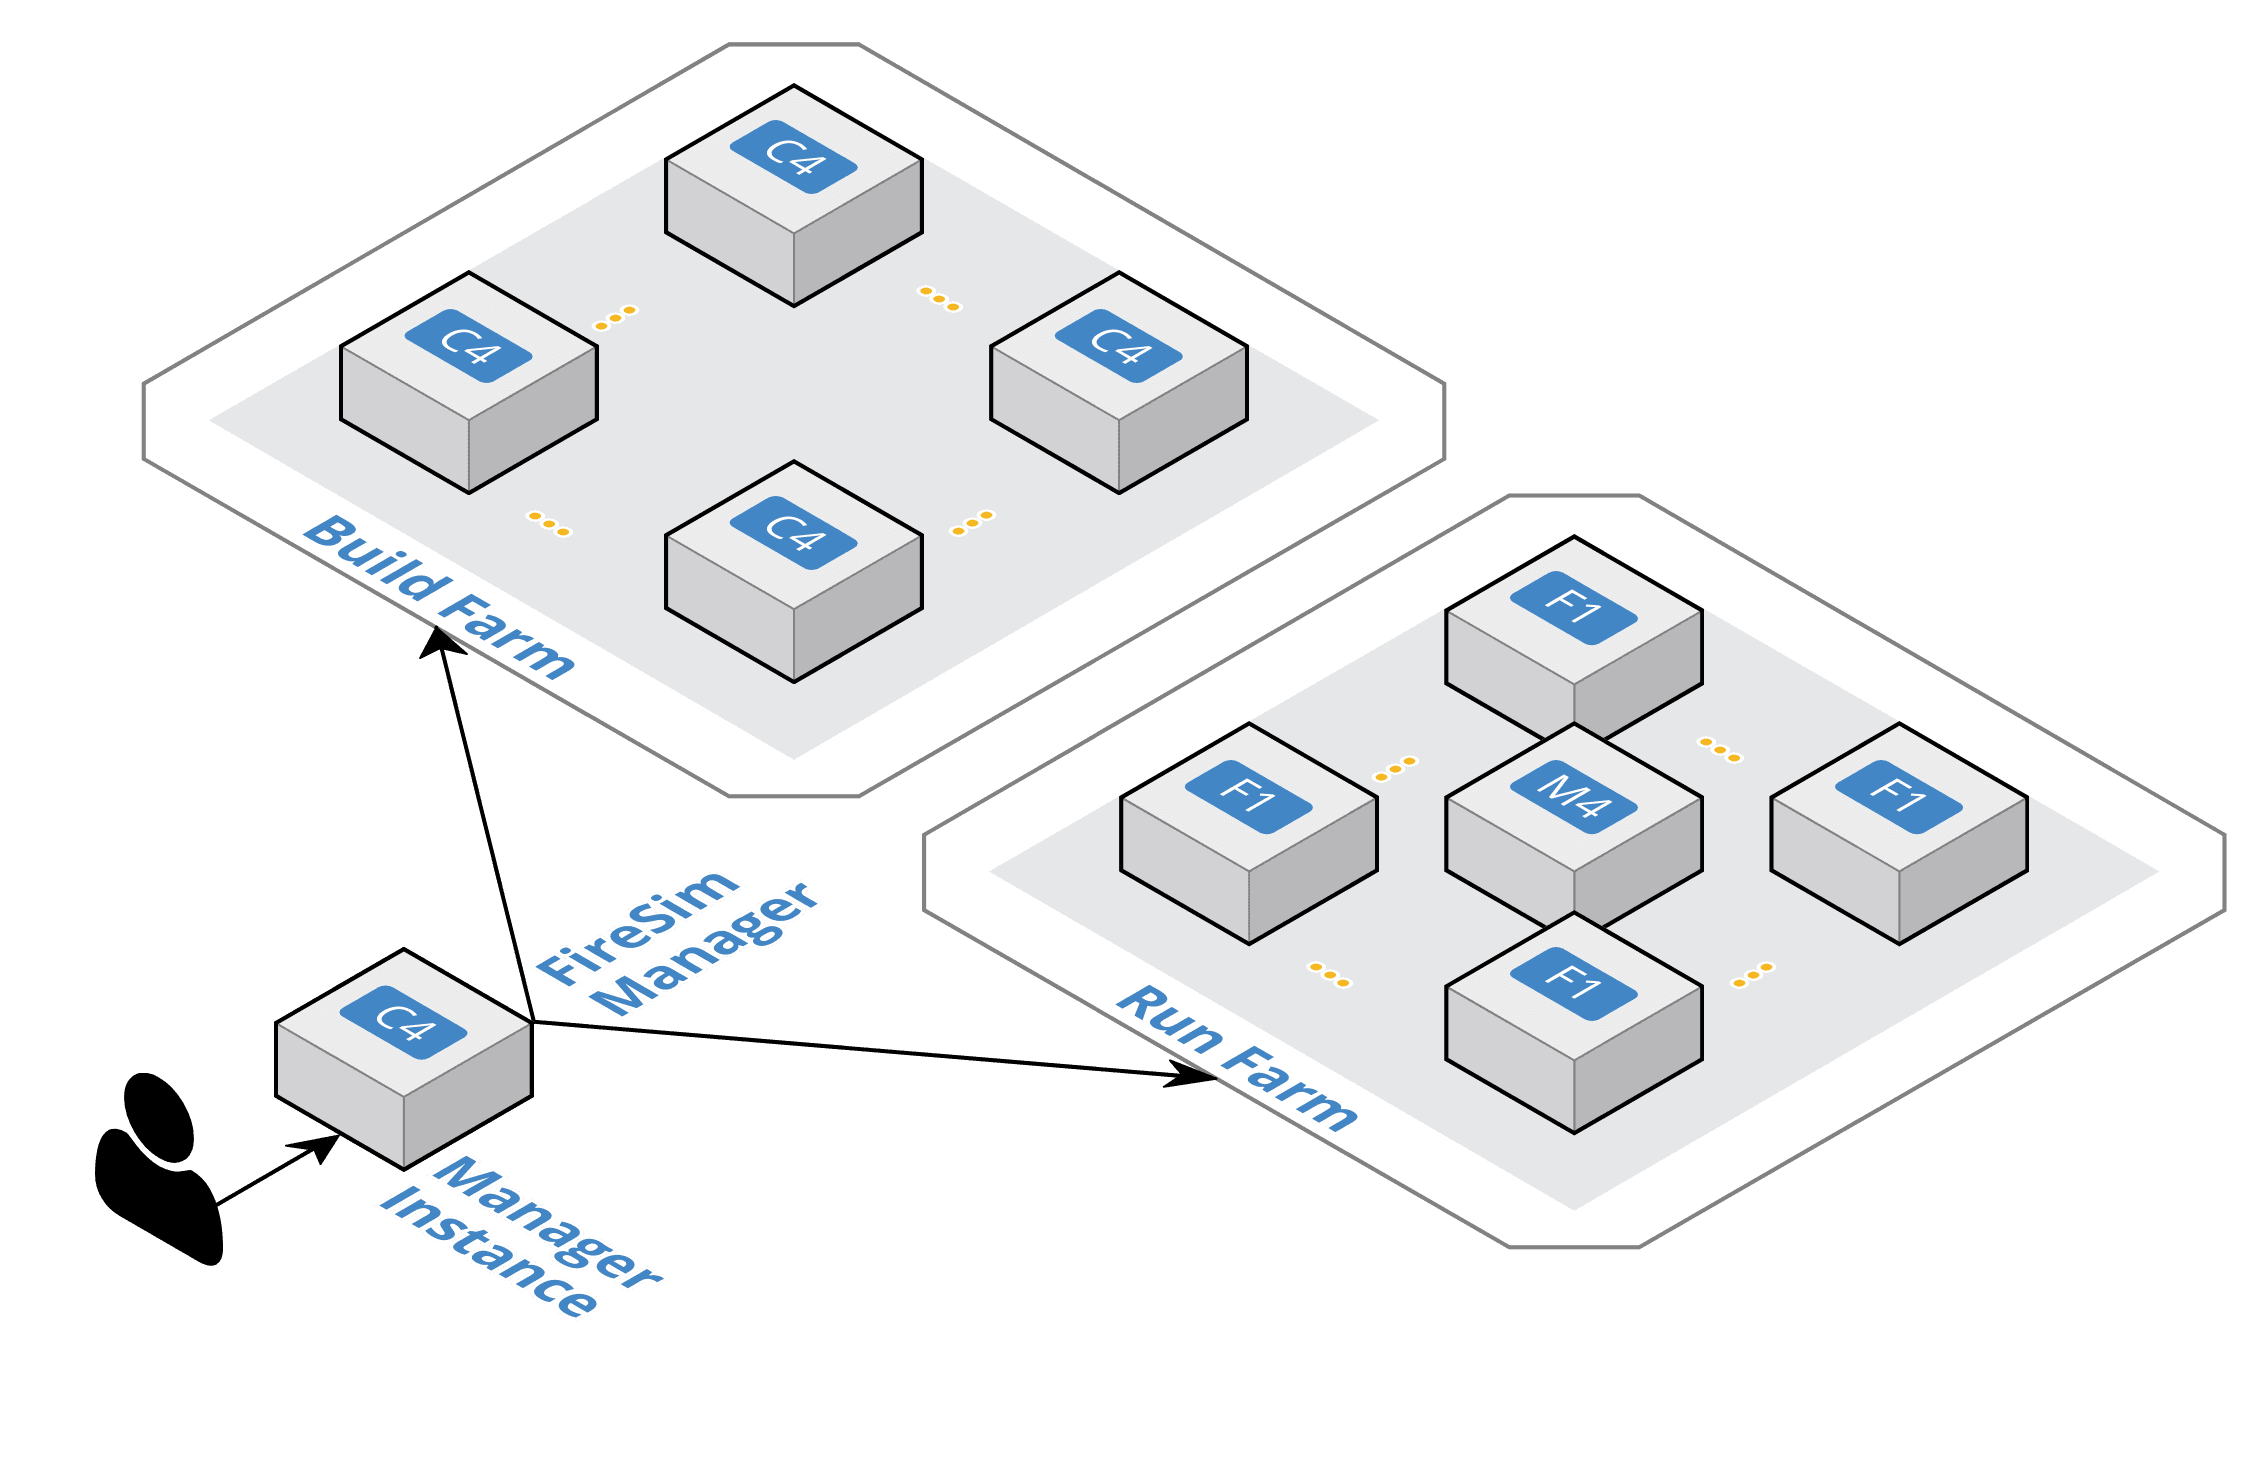
FireSim Infrastructure Diagram
- FireSim Manager (
firesim) This program (available on your path as
firesimonce we source necessary scripts) automates the work required to launch FPGA builds and run simulations. Most users will only have to interact with the manager most of the time. If you’re familiar with tools like Vagrant or Docker, thefiresimcommand is just like thevagrantanddockercommands, but for FPGA simulators instead of VMs/containers.
Machines used to build and run FireSim simulations are broadly classified into three groups:
- Manager Machine
This is the main host machine (e.g., your local desktop or server) that you will “do work” on. This is where you’ll clone your copy of FireSim and use the FireSim Manager to deploy builds/simulations from.
- Build Farm Machines
These are a collection of local machines (“build farm machines”) that are used by the FireSim manager to run FPGA bitstream builds. The manager will automatically ship all sources necessary to run builds to these machines and will run the Verilog to FPGA bitstream build process on them.
- Run Farm Machines
These are a collection of local machines (“run farm machines”) with FPGAs attached that the manager manages and deploys simulations onto. You can use multiple Run Farms in parallel to run multiple separate simulations in parallel.
In the simplest setup, a single host machine (e.g. your desktop) can serve the function of all three of these: as the manager machine, the build farm machine (assuming Vivado is installed), and the run farm machine (assuming an FPGA is attached).
One final piece of terminology will also be referenced throughout these docs:
- Golden Gate
The FIRRTL compiler in FireSim that converts target RTL into a decoupled simulator. Formerly named MIDAS.
System Setup
The below sections outline what you need to install to run FireSim on each machine type in a FireSim cluster. Note that the below three machine types can all map to a single machine in your setup; in this case, you should follow all the installation instructions on your single machine, without duplication (i.e., don’t re-run a step on the same machine if it is required on multiple machine types).
Warning
We highly recommend using Ubuntu 20.04 LTS as the host operating system for all machine types in an on-premises setup, as this is the OS recommended by Xilinx.
1. Fix default .bashrc
Machines: Manager Machine, Run Farm Machines, Build Farm Machines.
We need various parts of the ~/.bashrc file to execute even in non-interactive mode.
To do so, edit your ~/.bashrc file so that the following section is removed:
# If not running interactively, don't do anything
case $- in
     *i*) ;;
       *) return;;
esac
2. Enable password-less sudo
Machines: Manager Machine and Run Farm Machines.
Enable passwordless sudo by running sudo visudo, then adding
the following line at the end of the file, replacing YOUR_USERNAME_HERE
with your actual username on the machine:
YOUR_USERNAME_HERE ALL=(ALL) NOPASSWD:ALL
Once you have done so, reboot the machines
and confirm that you are able to run sudo true without being
prompted for a password.
3. Install Vivado Lab and Cable Drivers
Machines: Run Farm Machines.
Go to the Xilinx Downloads Website and download Vivado 2023.1: Lab Edition - Linux.
Extract the downloaded .tar.gz file, then:
cd [EXTRACTED VIVADO LAB DIRECTORY]
sudo ./installLibs.sh
sudo ./xsetup --batch Install --agree XilinxEULA,3rdPartyEULA --edition "Vivado Lab Edition (Standalone)"
This will have installed Vivado Lab to /tools/Xilinx/Vivado_Lab/2023.1/.
For ease of use, add the following to the end of your ~/.bashrc:
source /tools/Xilinx/Vivado_Lab/2023.1/settings64.sh
Then, open a new terminal or source your ~/.bashrc.
Next, install the cable drivers like so:
cd /tools/Xilinx/Vivado_Lab/2023.1/data/xicom/cable_drivers/lin64/install_script/install_drivers/
sudo ./install_drivers
4. Install the Xilinx XDMA and XVSEC drivers
Machines: Run Farm Machines.
First, run the following to clone the XDMA kernel module source:
cd ~/   # or any directory you would like to work from
git clone https://github.com/Xilinx/dma_ip_drivers
cd dma_ip_drivers
git checkout 0e8d321
cd XDMA/linux-kernel/xdma
The directory you are now in contains the XDMA kernel module. Now, let’s build and install it:
sudo make install
Now, test that the module can be inserted:
sudo insmod /lib/modules/$(uname -r)/extra/xdma.ko poll_mode=1
lsmod | grep -i xdma
The second command above should have produced output indicating that the XDMA driver is loaded.
Next, we will do the same for the XVSEC driver, which is pulled from a separate repository due to kernel version incompatibility:
cd ~/   # or any directory you would like to work from
git clone https://github.com/paulmnt/dma_ip_drivers dma_ip_drivers_xvsec
cd dma_ip_drivers_xvsec
git checkout 302856a
cd XVSEC/linux-kernel/

make clean all
sudo make install
Now, test that the module can be inserted:
sudo modprobe xvsec
lsmod | grep -i xvsec
The second command above should have produced output indicating that the XVSEC driver is loaded.
Also, make sure you get output for the following (usually, /usr/local/sbin/xvsecctl):
which xvsecctl
5. Install your FPGA(s)
Machines: Run Farm Machines.
Now, let’s attach your Xilinx VCU118 FPGA(s) to your Run Farm Machines:
Poweroff your machine.
Insert your Xilinx VCU118 FPGA into an open PCIe slot in the machine. Also, ensure that the SW16 switches on the board are set to
0101to enable QSPI flashing over JTAG (i.e.,position 1 = 0,position 2 = 1,position 3 = 0, andposition 4 = 1. Having the switch set to the side of the position label indicates 0.)Attach any additional power cables between the FPGA and the host machine. For the VCU118, this is usually ATX 4-pin peripheral power (NOT PCIe power) from the system’s PSU, attached to the FPGA via the “ATX Power Supply Adapter Cable” that comes with the VCU118.
Attach the USB cable between the FPGA and the host machine for JTAG.
Boot the machine.
Obtain an existing bitstream tar file for your FPGA by opening the
bitstream_tarURL listed underxilinx_vcu118_firesim_rocket_singlecore_4GB_no_nicin the following file: deploy/sample-backup-configs/sample_config_hwdb.yaml.Extract the
.tar.gzfile to a known location. Inside, you will find four files; the ones we are currently interested in will be calledfiresim.mcsandfiresim_secondary.mcs. Note the full path of thefiresim.mcsandfiresim_secondary.mcsfiles for the next step.Open Vivado Lab and click “Open Hardware Manager”. Then click “Open Target” and “Auto connect”.
Right-click on your FPGA and click “Add Configuration Memory Device”. For a Xilinx VCU118, choose
mt25qu01g-spi-x1_x2_x4_x8as the Configuration Memory Part. Click “OK” when prompted to program the configuration memory device.For Configuration file, choose the
firesim.mcsfile from step 7 and for Configuration file 2, choose thefiresim_secondary.mcsfile from step 7.Uncheck “Verify” and click OK.
When programming the configuration memory device is completed, power off your machine fully (i.e., the FPGA should completely lose power). Then, set the SW16 switches on the board to
0001to set the board to automatically program the FPGA from the QSPI at boot (i.e.,position 1 = 0,position 2 = 0,position 3 = 0, andposition 4 = 1. Having the switch set to the side of the position label indicates 0.)Cold-boot the machine. A cold boot is required for the FPGA to be successfully re-programmed from its flash.
Once the machine has booted, run the following to ensure that your FPGA is set up properly:
lspci -vvv -d 10ee:903f
If successful, this should show an entry with Xilinx as the manufacturer and two memory regions. There should be one entry for each FPGA you’ve added to the Run Farm Machine.
6. Install sshd
Machines: Manager Machine, Run Farm Machines, and Build Farm Machines
On Ubuntu, install openssh-server like so:
sudo apt install openssh-server
7. Set up SSH Keys
Machines: Manager Machine.
On the manager machine, generate a keypair that you will use to ssh from the manager machine into the manager machine (ssh localhost), run farm machines, and build farm machines:
cd ~/.ssh
ssh-keygen -t ed25519 -C "firesim.pem" -f firesim.pem
[create passphrase]
Next, add this key to the authorized_keys file on the manager machine:
cd ~/.ssh
cat firesim.pem.pub >> authorized_keys
chmod 0600 authorized_keys
You should also copy this public key into the ~/.ssh/authorized_keys files
on all of your Run Farm and Build Farm Machines.
Returning to the Manager Machine, let’s set up an ssh-agent:
cd ~/.ssh
ssh-agent -s > AGENT_VARS
source AGENT_VARS
ssh-add firesim.pem
If you reboot your machine (or otherwise kill the ssh-agent), you
will need to re-run the above four commands before using FireSim.
If you open a new terminal (and ssh-agent is already running),
you can simply run source ~/.ssh/AGENT_VARS.
Finally, confirm that you can now ssh localhost and ssh into your Run Farm
and Build Farm Machines without being prompted for a passphrase.
8. Install Guestmount
Machines: Manager Machine and Run Farm Machines
Next, install the guestmount program:
sudo chmod +r /boot/vmlinuz-*
sudo apt install libguestfs-tools
sudo chmod +r /boot/vmlinuz-*
This is needed by a variety of FireSim steps that mount disk images in order to copy in/out results of simulations out of the images.
Using guestmount instead of the standard mount commands allows for users to perform these operations without requiring sudo (after this initial installation).
Let’s double check that guestmount is functioning correctly on your system. To do so, we’ll generate a dummy filesystem image:
cd ~/   # or any scratch area
mkdir sysroot-testing
cd sysroot-testing
mkdir sysroot
dd if=/dev/urandom of=sysroot/myfile bs=1024 count=1024
virt-make-fs --format=qcow2 --type=ext2 sysroot sysroot.qcow2
Ensure that this command completed without producing an error and that the output file sysroot.qcow2 exists.
Assuming all of this completed successfully (i.e., no error from virt-make-fs), you can delete the sysroot-testing directory,
since we will not need it any longer.
Warning
Due to prior issues we’ve seen with guestmount, ensure that your FireSim repository
does not reside on an NFS mount.
9. Check Hard File Limit
Machine: Manager Machine
Check the output of the following command:
ulimit -Hn
If the result is greater than or equal to 16384, you can continue on to “Setting up the FireSim Repo”. Otherwise, run:
echo "* hard nofile 16384" | sudo tee --append /etc/security/limits.conf
Then, reboot your machine.
10. Verify Run Farm Machine environment
Machines: Manager Machine and Run Farm Machines
Finally, let’s ensure that the Xilinx Vivado Lab tools are properly sourced in
your shell setup (i.e. .bashrc) so that any shell on your Run Farm Machines
can use the corresponding programs. The environment variables should be
visible to any non-interactive shells that are spawned.
You can check this by running the following on the Manager Machine,
replacing RUN_FARM_IP with localhost if your Run Farm machine
and Manager machine are the same machine, or replacing it with the Run Farm
machine’s IP address if they are different machines.
ssh RUN_FARM_IP printenv
Ensure that the output of the command shows that the Xilinx Vivado Lab tools are
present in the printed environment variables (i.e., PATH).
If you have multiple Run Farm machines, you should repeat this process for
each Run Farm machine, replacing RUN_FARM_IP with a different Run Farm Machine’s
IP address.
Congratulations! We’ve now set up your machine/cluster to run simulations. Click Next to continue with the guide.