Initial Setup/Installation
Warning
⚠️ We highly recommend using the XDMA-based U250 flow instead of this Vitis-based flow. You can find the XDMA-based flow here: Xilinx Alveo U250 XDMA-based Getting Started Guide. The Vitis-based flow does not support DMA-based FireSim bridges (e.g., TracerV, Synthesizable Printfs, etc.), while the XDMA-based flows support all FireSim features. If you’re unsure, use the XDMA-based U250 flow instead: Xilinx Alveo U250 XDMA-based Getting Started Guide
Background/Terminology
Before we jump into setting up FireSim, it is important to clarify several terms that we will use throughout the rest of this documentation.
First, to disambiguate between the hardware being simulated and the computers doing the simulating, we define:
- Target
The design and environment being simulated. Commonly, a group of one or more RISC-V SoCs with or without a network between them.
- Host
The computers/FPGAs executing the FireSim simulation – the Run Farm below.
We frequently prefix words with these terms. For example, software can run on the simulated RISC-V system (target-software) or on a host x86 machine (host-software).
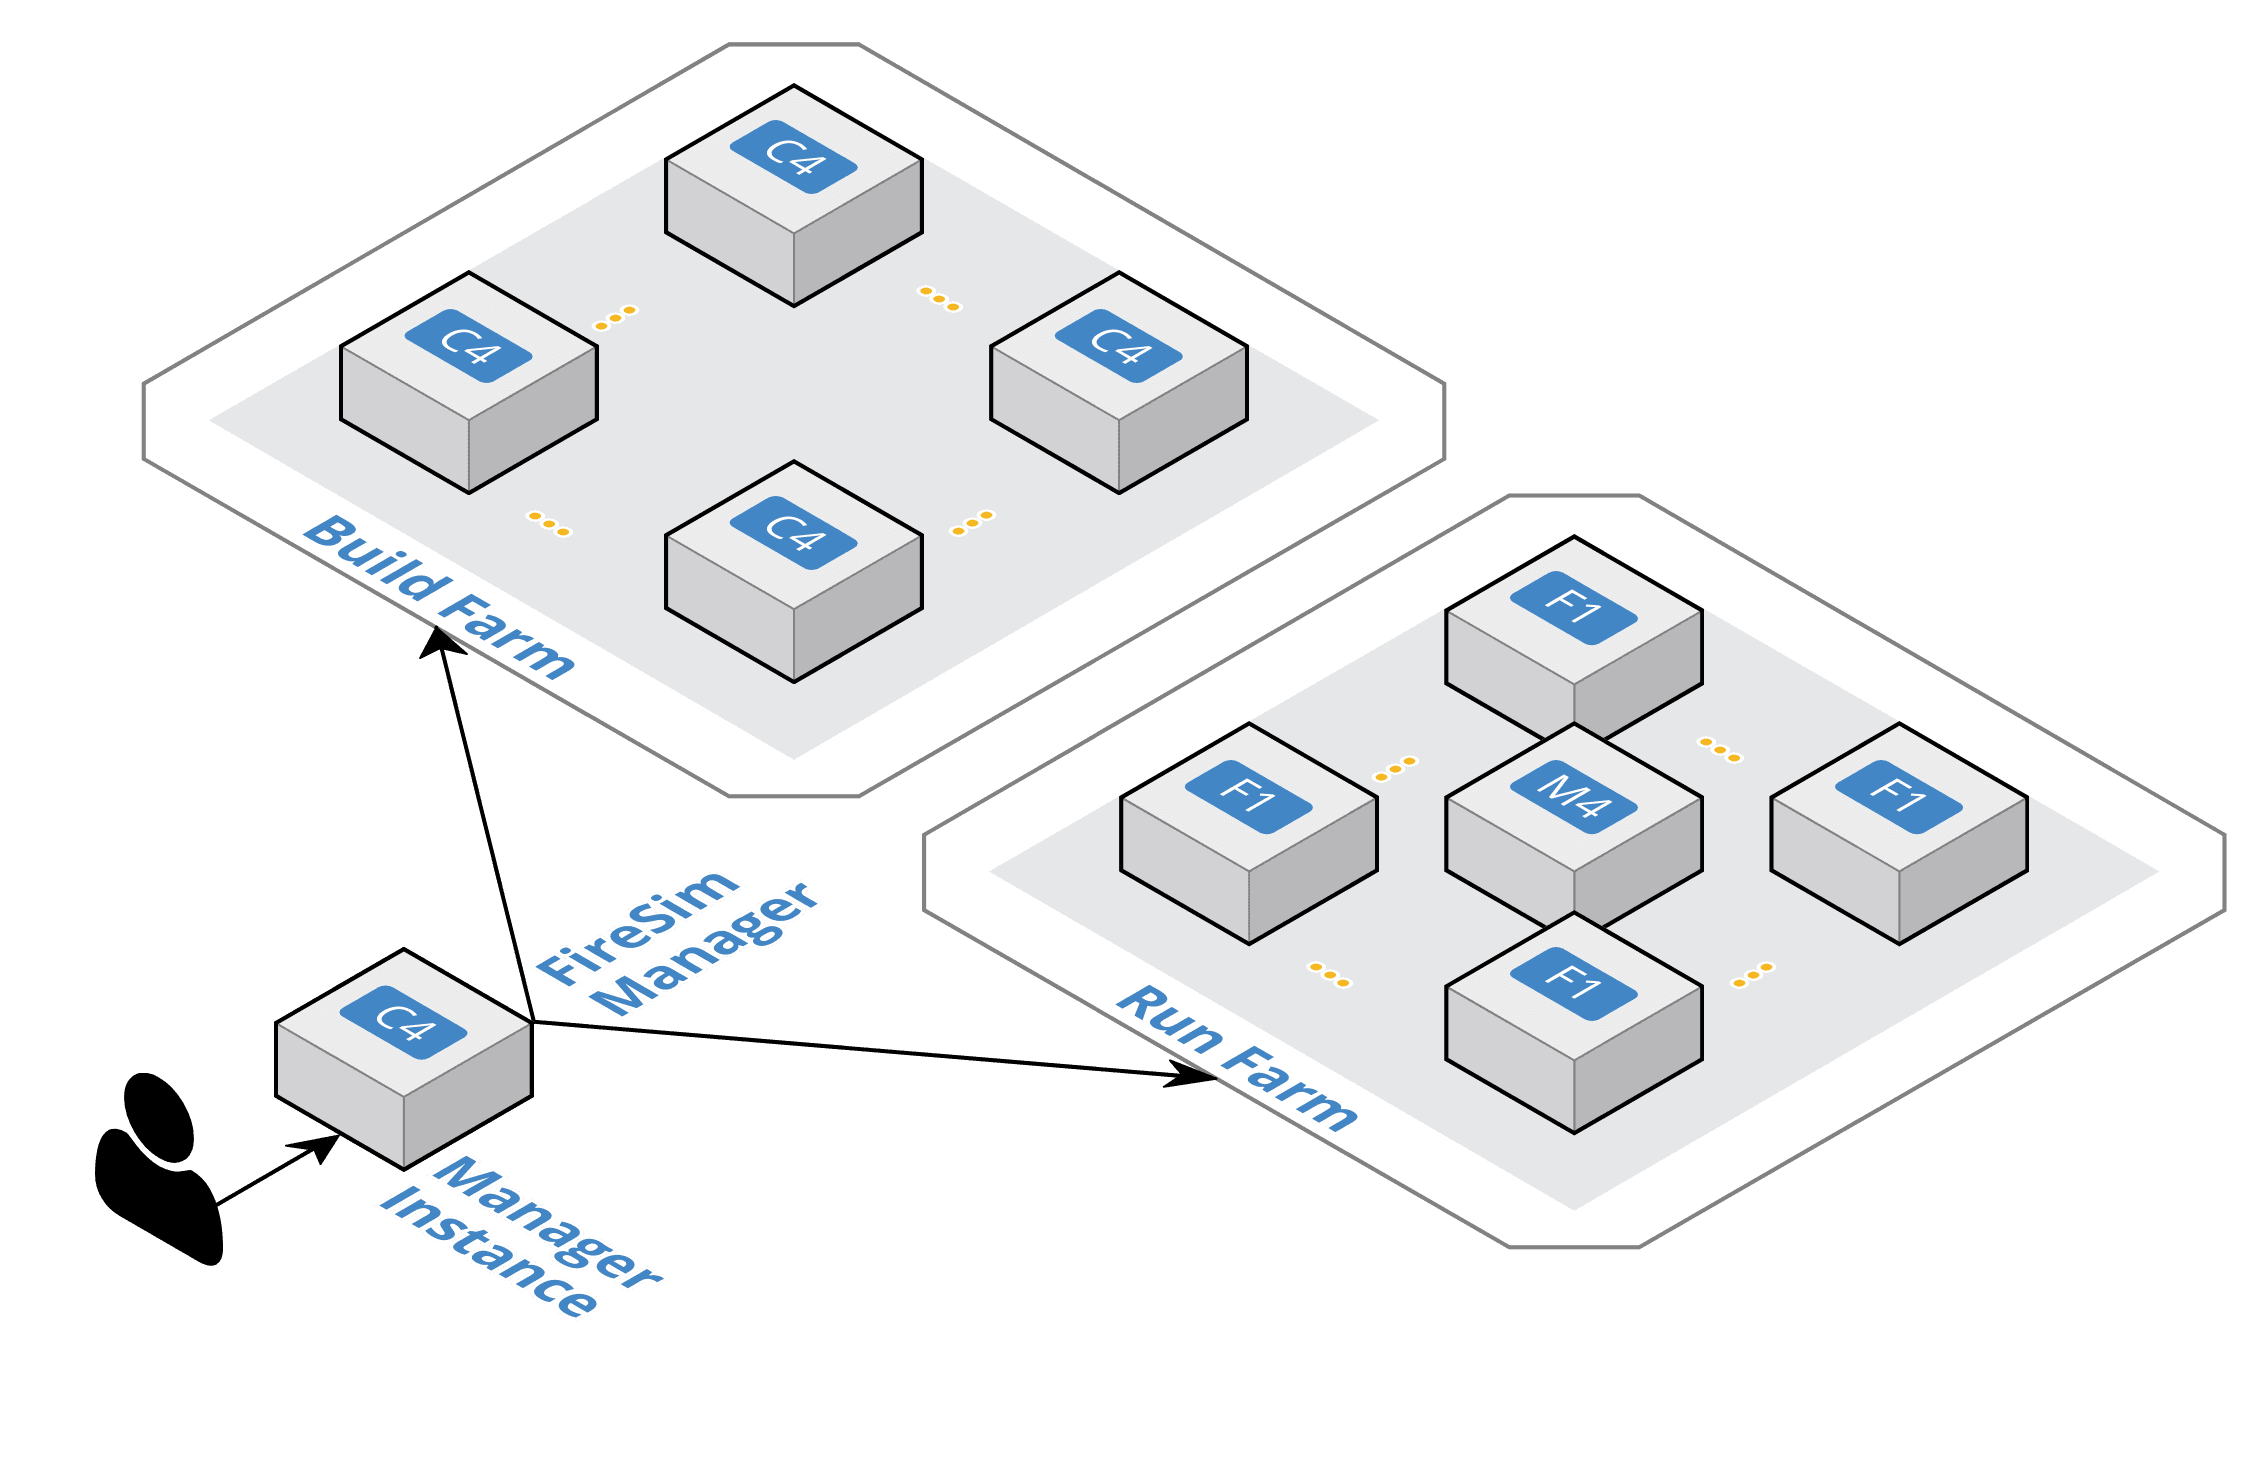
FireSim Infrastructure Diagram
- FireSim Manager (
firesim) This program (available on your path as
firesimonce we source necessary scripts) automates the work required to launch FPGA builds and run simulations. Most users will only have to interact with the manager most of the time. If you’re familiar with tools like Vagrant or Docker, thefiresimcommand is just like thevagrantanddockercommands, but for FPGA simulators instead of VMs/containers.
Machines used to build and run FireSim simulations are broadly classified into three groups:
- Manager Machine
This is the main host machine (e.g., your local desktop or server) that you will “do work” on. This is where you’ll clone your copy of FireSim and use the FireSim Manager to deploy builds/simulations from.
- Build Farm Machines
These are a collection of local machines (“build farm machines”) that are used by the FireSim manager to run FPGA bitstream builds. The manager will automatically ship all sources necessary to run builds to these machines and will run the Verilog to FPGA bitstream build process on them.
- Run Farm Machines
These are a collection of local machines (“run farm machines”) with FPGAs attached that the manager manages and deploys simulations onto. You can use multiple Run Farms in parallel to run multiple separate simulations in parallel.
In the simplest setup, a single host machine (e.g. your desktop) can serve the function of all three of these: as the manager machine, the build farm machine (assuming Vivado is installed), and the run farm machine (assuming an FPGA is attached).
One final piece of terminology will also be referenced throughout these docs:
- Golden Gate
The FIRRTL compiler in FireSim that converts target RTL into a decoupled simulator. Formerly named MIDAS.
FPGA and Tool Setup
Requirements and Installations
We require a base machine that is able to support a Xilinx Vitis-enabled U250 and running Xilinx Vitis.
For the purposes of this guide, we assume you are running with a Xilinx Vitis-enabled U250.
Please refer to the minimum system requirements given in the following link: https://docs.xilinx.com/r/en-US/ug1301-getting-started-guide-alveo-accelerator-cards/Minimum-System-Requirements.
sudo access is not needed for the machine except for when the Xilinx Vitis-enabled U250 and corresponding software is installed.
Next, install the Xilinx Vitis-enabled U250 as indicated: https://docs.xilinx.com/r/en-US/ug1301-getting-started-guide-alveo-accelerator-cards/Card-Installation-Procedures
We require the following programs/packages installed from the Xilinx website in addition to a physical Xilinx Vitis-enabled U250 installation:
Xilinx Vitis 2022.1
Xilinx XRT and Xilinx Vitis-enabled U250 board package (corresponding with Vitis 2022.1)
Ensure you complete the “Installing the Deployment Software” and “Card Bring-Up and Validation” sections in the following link: https://docs.xilinx.com/r/en-US/ug1301-getting-started-guide-alveo-accelerator-cards/Installing-the-Deployment-Software
Setup Validation
After installing the Xilinx Vitis-enabled U250 using the Xilinx instructions and installing the specific versions of Vitis/XRT, let’s verify that the Xilinx Vitis-enabled U250 can be used for emulations. Ensure that you can run the following XRT commands without errors:
xbutil examine # obtain the BDF associated with your installed Xilinx Vitis-enabled U250
xbutil validate --device <CARD_BDF_INSTALLED> --verbose
The xbutil validate command runs simple tests to ensure that the FPGA can be properly flashed with a bitstream by using XRT.
Warning
Anytime the host computer is rebooted you may need to re-run parts of the setup process (i.e. re-flash the shell).
Before continuing to FireSim simulations after a host computer reboot, ensure that the previously mentioned xbutil command is successful.
Now you’re ready to continue with other FireSim setup!
Setting up your On-Premises Machine
This guide will walk you through setting up a single node cluster (i.e. running FPGA bitstream builds and simulations on a single machine) for FireSim use. This single machine will serve as the “Manager Machine” that acts as a “head” node that all work will be completed on.
Finally, ensure that the Xilinx XRT/Vitis tools are sourced in your shell setup (i.e. .bashrc and or .bash_profile) so that any shell can use the corresponding programs.
The environment variables should be visible to any non-interactive shells that are spawned.
You can check this by ensuring that the output of the following command shows that the Xilinx XRT/Vitis tools are present in the environment variables (i.e. “XILINX_XRT”):
ssh localhost printenv
Other Miscellaneous Setup
Additionally, you should be able to run ssh localhost without needing a password.
The FireSim manager program runs all commands by ssh-ing into a BuildFarm/RunFarm machine given an IP address then running the command.
To do so non-interactively, it needs passwordless access to the machines (in our case, localhost) to build/run on.
To safely enable passwordless access, you can first create a unique SSH key and add it to the ~/.ssh/authorized_keys file.
For example, the following instructions will create a SSH key called id_rsa_local and add it to the authorized keys:
cd ~/.ssh

# create the new key with name `id_rsa_local` and a comment
# you can use a different name (and modify the comment)
ssh-keygen -f id_rsa_local -C "@localhost"

# add the key to the `authorized_keys` file
cat id_rsa_local.pub >> authorized_keys
chmod 600 authorized_keys
Next, you should use that key to for localhost logins by modifying your ~/.ssh/config file so that the SSH agent can use that SSH key.
For example:
# add the following lines
Host localhost
   IdentityFile ~/.ssh/id_rsa_local
Finally, you should also install the guestmount program and ensure it runs properly.
This is needed by a variety of FireSim steps that mount disk images in order to copy in/out results of simulations out of the images.
Most likely you will need to follow the instructions here to ensure guestmount doesn’t error.
Warning
If using guestmount, verify that the command is able to work properly.
Due to prior issues with guestmount internally, ensure that your FireSim repository (and all temporary directories)
does not reside on an NFS mount.
Setting up the FireSim Repo
We’re finally ready to fetch FireSim’s sources. Run:
 git clone https://github.com/firesim/firesim
 cd firesim
 # checkout latest official firesim release
 # note: this may not be the latest release if the documentation version != "stable"
 git checkout 1.17.1
Next, we will bootstrap the machine by installing Miniforge Conda, our software package manager, and set up a default software environment using Conda. First run the following to see the options to the bootstrap script:
./scripts/machine-launch-script.sh --help
Make sure you understand the options and appropriately run the command.
For example, if you already installed Conda you can use the --prefix flag to point to an existing installation.
You can also use that same flag to setup Conda in a non-sudo required location.
Next run the machine-launch-script.sh, with the options your setup requires.
Below we will give a few examples on how to run the command (choose the command or modify it accordingly):
Warning
We recommend you re-install Conda in favor of Miniforge Conda (a minimal installation of Conda).
sudo ./scripts/machine-launch-script.sh
./scripts/machine-launch-script.sh --prefix REPLACE_USER_SPECIFIED_LOCATION
./scripts/machine-launch-script.sh --prefix REPLACE_PATH_TO_CONDA
If the option is selected, the script will install Miniforge Conda (https://github.com/conda-forge/miniforge) and create a default environment called firesim that is used.
Ensure that you log out of the machine / exit out of the terminal after this step so that .bashrc modifications can apply.
After re-logging back into the machine, you should be in the firesim Conda environment (or whatever you decided to name the
environment in the machine-launch-script.sh).
Verify this by running:
conda env list
If you are not in the firesim environment and the environment exists, you can run the following to “activate” or enter the environment:
conda activate firesim # or whatever the environment is called
Next run:
./build-setup.sh
The build-setup.sh script will validate that you are on a tagged branch,
otherwise it will prompt for confirmation.
This will have initialized submodules and installed the RISC-V tools and
other dependencies.
Next, run:
source sourceme-manager.sh --skip-ssh-setup
This will perform various environment setup steps, such as adding the RISC-V tools to your path. Sourcing this the first time will take some time – however each time after that should be instantaneous.
Every time you want to use FireSim, you should cd into
your FireSim directory and source this file again with the argument given.
Final Environment Check
Finally, let’s verify that the environment variables are correctly set up for the rest of this guide. Run:
echo $PATH
You should see that both the Xilinx XRT/Vitis tools are located in the PATH are are after
the Conda environment path. Next run:
echo $LD_LIBRARY_PATH
You should see that the Xilinx XRT/Vitis tools are located on your LD_LIBRARY_PATH and that there
is no trailing : (otherwise compilation will error later).
Finally verify that Xilinx XRT/Vitis tools are found when running locally through ssh. Run:
ssh localhost printenv
Inspect that both the PATH and LD_LIBRARY_PATH are setup similarly to running
locally (without ssh localhost).
Completing Setup Using the Manager
The FireSim manager contains a command that will finish the rest of the FireSim setup process. To run it, do the following:
firesim managerinit --platform vitis
It will create initial configuration files, which we will edit in later sections.
Hit Next to continue with the guide.